Remember when I started to Googling around to search for Sencha Touch 2 tutorial, all I found was pieces of here and there, so I write this very simple example (probably not even close to best practice, but it get job done), from creating Sencha Touch front end, to storing data in server.
Required pieces: – Sencha Touch 2 SDK – Web server – Webkit based web browser
The reason web server is needed, beside to run some server script, is that Sencha Touch does not work properly (some part) using file:// protocol.
I’m using MVC style here. In Sencha Touch, Model is use to describe the data structure, thing of it as the table in database, it has column and datatype. Model handle validation, and proxy thingy (which URL to point to, what datatype is the response).
View just simply displaying the GUI. Controller is probably best describe as the brain, it glue the View and Model together. And there’s a Store, which responsible to store the the records/data get from server.
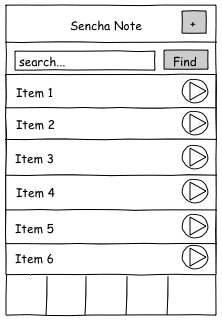
The is how’s the main screen of the apps will looks like:

The main screen will show the list of notes, a search bar to searching notes, an add button on top to add new note, and bottom I still don’t have idea what to add in, just leave it as it is at the moment. Note that the list is showing arrow at the side, it means that when you tap on it, it should show the edit screen.
Folder Structure

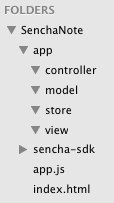
I’m going to name the application SenchaNote, so I created the folder with the subfolder shown. It’s important to have the similar structure, as Sencha Touch will automagically locate the required file from the respective folder. The folder sencha-sdk is where I keep my SDK for development use (folder name not important), it is not required to be there (not whole folder) when deploy.
With the folder created above, whatever View I’m creating will go to app/view folder, whatever Controller will go to app/controller, etc.
index.html
<!DOCTYPE html>
<html>
<head>
  <title>Sencha Note</title>
  <link rel=”stylesheet" href="sencha-sdk/resources/css/sencha-touch.css" type="text/css">
  <link rel="stylesheet" href="sencha-sdk/resources/css/apple.css" type="text/css">
  <script type="text/javascript" src="sencha-sdk/sencha-touch-debug.js"></script>
  <script type="text/javascript" src="app.js"></script>
</head>
<body>
</body>
</html>
This file only use to include all the necessary JavaScript and CSS file.
app.js
Ext.application({
  name: "SenchaNote",
  icon: "resources/images/app-icon.png",
  phoneIcon: "resources/images/app-phone-icon.png",
  views: ["Viewport"], //screen to be display
  launch: function() {
    Ext.create("SenchaNote.view.Viewport");
  }
});
This file is the entry point of the apps, it basically create the apps, include everything needed and run. The name is important, it will be use as the namespace throughout the apps. The icon and phoneIcon will show up on iOS home screen if you add the page to home screen, not sure about Android.
The views array there is to tell the apps to include the required view, there is controllers, models and stores later on. The launch function is the main entry function, in there, I create a instance of the SenchaNote.view.Viewport (Viewport is the main view to contain subviews I’ll add it on later).
Note that how I define the view, SenchaNote.view.Viewport, as in <app name>.<mvc>.<view name>, and is important to save the file with the same name in the respective folder. E.g. SenchaNote.view.Viewport will be saved as Viewport.js in the app/view folder.
app/view/Viewport.js
Ext.define("SenchaNote.view.Viewport", {
  extend: "Ext.Panel",
  initialize: function() {},
  config: {
    fullscreen: true,
    layout: "card", //needed for tabbed screen
    items: [] //more view to be added
  }
});
Here we define a new “class” (there is no class in JavaScript), the name of the class is SenchaNote.view.Viewport (note that naming convention). Then extend (inherit) the built in Ext.Panel, most of the time I’m using Panel as the container. Every time define something new, we can set some configuration inside the config.

From the documentation, there is one handy toolbar, showing all the configuration, properties, methods and events available. For everything under the config: { }, just refer to the Configs in the documentation.
app/view/MainPanel.js
Ext.define("SenchaNote.view.MainPanel", {
  extend: "Ext.tab.Panel",
  xtype: "mainpanel",
  config: {
    tabBarPosition: "bottom", //so that the tab, Home, About or whatever will added later show at bottom
    items: [] //will add more view later
  }
});
The MainPanel will be use to host all other sub views, like list, search bar and toolbar. And since I wanted to have the little tab button on below later on (like the one on Music apps in iOS for changing screen to album, artist, etc), so I need to extend the Ext.tab.Panel. The xtype will allow us to add the MainPanel into other view (Viewport in this case) by referring to “mainpanel“.
Add the MainPanel to Viewport like this:
app/view/Viewport.js
Ext.define("SenchaNote.view.Viewport", {
  extend: "Ext.Panel",
  initialize: function() {},
  config: {
    fullscreen: true,
    layout: "card",
    items: [
      {
        xtype: "mainpanel"
      }
    ] //mainpanel xtype is defined in MainPanel.js
  }
});
Now the application doesn’t recognize the MainPanel’s existence, until we added it in app.js
app.js
Ext.application({
  name: "SenchaNote",
  icon: "resources/images/app-icon.png",
  phoneIcon: "resources/images/app-phone-icon.png",
  views: ["Viewport", "MainPanel"], //add MainPanel here
  launch : function() {
    //need only this, because MainPanel was included in Viewport
    Ext.create("SenchaNote.view.Viewport");
  }
});
Now prepare the search bar view (yes, even if is just a small part, it still a view)
app/view/SearchBar.js
Ext.define("SenchaNote.view.SearchBar", {
  extend: "Ext.Toolbar",
  xtype: "searchbar",
  requires: ["Ext.field.Search"], //is like Import in VB.NET or using in C#
  initialize: function() {
    var searchbar = {
      xtype: "toolbar",
      ui: "searchbar",
      items: [
        {
          xtype: "searchfield",
          placeHolder: "Search…",
          flex: 1
        },
        {
          xtype: "button",
          text: "Search",
          handler: this.onSearch, //calling onSearch when clicked
          scope: this
        }
      ]
    };
    this.add([searchbar]);
  },
  config: {
    docked: "top", //make toolbar stay on top to become title bar
    ui: "searchbar", //*ui* is use for color theme
    layout: "vbox"
  },
  onSearch: function() {
    //to be fire the controller event when search button clicked
  },
});
Because I want the search bar to be stay on top and have a button there, so it’s easy to do it with Ext.Toolbar. The requires simply means like including Sencha Touch’s built in class/functionality, usually the browser will log some error in console if it required (provided using sencha-touch-debug.js).
Here I defined a onSearch function, to handle the search button click. I didn’t use the config to define the search bar because it does not capture the button on click event (and example taught me so).
Beside using Ext.define, one can create an object using normal JavaScript’s var. Here I create an object using *xtype for toolbar, searchfield and button, just like when I specified the xtype for my mainpanel, Sencha Touch internally does that.
Nothing much on the code here, basically is just creating a toolbar, inside got search field and button. Note that I put a flex:1 there, in order to make the search field fill the space. (more on this on Sencha website)
Now to create the note list.
app/view/NoteList.js
Ext.define("SenchaNote.view.NoteList", {
  extend: "Ext.dataview.List",
  xtype: "notelist",
  config: {
    store: "Note", //will create the store later
    itemTpl: [
      '<div>',
      '<div>{content}</div>',
      '<div>{category}</div>',
      '</div>',
    ],
    onItemDisclosure: function(record, btn, index) {
      //when the little arrow on the right is tapped
    }
  },
});
For listing, we need to use Ext.dataview.List. In the config section, the store is telling the list where to get the data and bind it on the list (think of it as GridView in ASP.NET, more on this later).
The itemTpl define the HTML template to display the data, each keyword in curly bracket (e.g. {content}, {category}) is the field name defined in Model where the Store is link to.
When the onItemDisclosure exists, each item on the list will have an arrow button on the right, when it tapped, it will fire the onItemDisclosure event, which then we’ll need to handle and switch screen.
Now to add both search bar and note list to a container, before put it in the MainPanel. The reason I add these two into another container is because when the list item is tapped, I want to swap out this whole screen and replace with editing screen, so by using extra container, I can host it and the editing screen in the MainPanel and swap it.
app/view/NoteListContainer.js
Ext.define("SenchaNote.view.NoteListContainer", {
  extend: "Ext.Panel",
  xtype: "notelistcontainer",
  requires: ["SenchaNote.view.NoteList", "SenchaNote.view.SearchBar"],
  initialize: function() {
    var toolbar = {
      xtype: "toolbar",
      docked: "top",
      title: "Note List",
      items: [
        { xtype: "spacer" }, //built in xtype, simply use for space
        {
          xtype: "button",
          text: "Add",
          handler: this.onAddNoteTap,
          scope: this
        }
      ]
    };
    //add toolbar, searchbar and notelist into this new container in sequence
    this.add([
      toolbar,
      { xtype: "searchbar" },
      { xtype: "notelist"}
    ]);
  },
  config: {
    layout: "fit", //critical for list to show
    title: "Note List", //show a nice text below the icon
    iconCls: "home" //to show a “house” icon on bottom tab panel
  },
  onAddNoteTap: function() {
  //to fire to controller when add button is tapped
  }
});
Here I create another toolbar because I want to display the title and the add button on top of the screen. The requires here being used because we’ll need the NoteList and SearchBar view here, so we’ll need to ‘import’ them.
Again I create my button in initialize because in config, it won’t capture the event properly.
Now to put this new container into MainPanel.
app/view/MainPanel.js
Ext.define("SenchaNote.view.MainPanel", {
  extend: "Ext.tab.Panel",
  xtype: "mainpanel",
  config: {
    tabBarPosition: "bottom",
    //just use the xtype of the NoteListContainer, how handy
    items: [
      {
        xtype: "notelistcontainer"
      }
    ]
  }
});
In order for the application to recognize the new NoteListContainer, we need to add it in app.js.
app.js
Ext.application({
  name: "SenchaNote",
  icon: "resources/images/app-icon.png",
  phoneIcon: "resources/images/app-phone-icon.png",
  views: ["Viewport", "MainPanel", "NoteListContainer"],
  launch: function() {
    Ext.create("SenchaNote.view.Viewport");
  }
});
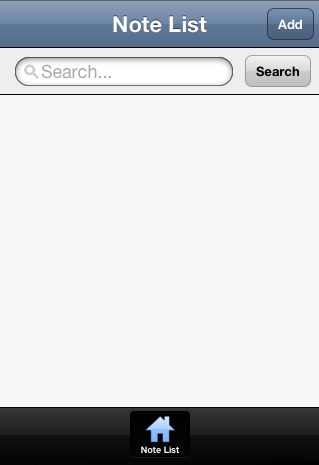
Now we got this

Next we need something to be display on the list, data! A Model and a Store will be needed.
app/model/Note.js
Ext.define("SenchaNote.model.Note", {
  extend: "Ext.data.Model",
  config: {
    idProperty: "id",
    fields: [
      { name: "id", type: "integer" }, //need an id field else model.phantom won’t work correctly
      { name: "content" , type: "string" },
      { name: "categoryid", type: "integer" },
      { name: "category", type: "string" }
    ],
    validations: [
      { type: "presence", field: "id" },
      { type: "presence", field: "content" },
      { type: "presence", field: "categoryid" }
    ]
  }
});
Here I create a Model called Note, using the Ext.data.Model. Here I define what field I wanted to have, now I only needed id (what record didn’t use id to differentiate from other?), title, categoryid (the category id for our note, use for selection, we’ll see), and category. All the field name is corresponded to the keyword in the itemTpl in the list.
With the config, I can easily define the name of field and data type, as well as validations. The validate I’m using here is check for required field, hence the presense type, there are few more, included Regex.
Then we need a Store for this model.
app/store/Note.js
Ext.define("SenchaNote.store.Note", {
  extend: "Ext.data.Store",
  requires: ["SenchaNote.model.Note"],
  config: {
    model: "SenchaNote.model.Note",
    proxy: {
      type: "ajax",
      api: {
        create: "http://192.168.168.10:8888/SenchaNote/Note.php?action=create",
        read: "http://192.168.168.10:8888/SenchaNote/Note.php",
        update: "http://192.168.168.10:8888/SenchaNote/Note.php?action=update",
        destroy: "http://192.168.168.10:8888/SenchaNote/Note.php?action=delete"
      },
      reader: {
        type: "json",
        rootProperty: "notes",
        totalProperty: "total"
      }
    },
    data: [
      { id: 1, content: "Blog 1", categoryid: 1, category: "Nonsense" },
      { id: 2, content: "Blog 2", categoryid: 1, category: "Nonsense" },
      { id: 3, content: "Blog 3", categoryid: 2, category: "Food" }
    ],
    autoLoad: true
  }
});
The usual culprit, the extend of Ext.data.Store, the requires (because we need to use our model here, no worries, browser will complain if you forgot, check console often!).
Here I define the model to be use for this store, which is Note. I no need to write the full SenchaNote.model.Note because Sencha Touch knows where to get it (if we name it properly).
The proxy used to define how to handle the data. Note that the type:”ajax” I used here might not work for cross domain, for cross domain, scripttag should be used.
The api is kind of interesting, I do not know how to properly update and delete my data on server (most tutorial didn’t show how), so I came across the api. Here we can specify for the CRUD operation, which url we will request, I’m still didn’t dig deep in this, so I do the quick and dirty way (normal way should be server script check for the header, GET, POST, etc), by passing in the query string here. More on the server side later.
The reader is to define how the model process the returned result, I request the json type, which is my new favorite type, and specify the root for the data, just like the XML, there is one root out there. The totalProperty is use to define which value should the model look at to determine the total record (this use for paging, with plug-in!).
The autoLoad, just as what it said, auto load the data when the screen is loaded. This will set to false, if want to do like search result, which it will only show when search button is clicked.
I commented out the whole Proxy at the moment because we need to test the GUI with dummy data, which defined in the data.
Since till now all the view is configured with store, and store configured with model, now just need to tell the application that we have a model and a store to be loaded.
app.js
Ext.application({
  name: "SenchaNote",
  icon: "resources/images/app-icon.png",
  phoneIcon: "resources/images/app-phone-icon.png",
  models: ["Note"],
  stores: ["Note"],
  views: ["Viewport","MainPanel", "NoteListContainer"],

  launch : function() {
    Ext.create("SenchaNote.view.Viewport");
  }
});
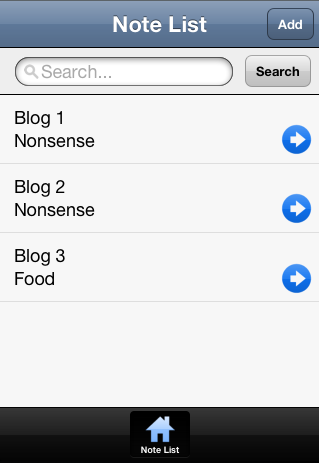
After refresh, there we have it.

A nice bouncy list.
On next post, I’ll add in an editing screen, an About page, the add screen, search function, and possibly paging and server side script.
Related posts: